I'm so excited to finally show you my revamped craft room! You can see what my craft room used to look like here. My revamped room has included a paint job, new carpet, new blinds, refurbished desk and new fitted unit.
I planned for over a year how I wanted my room to look. Of course, it had to be functional but I also wanted it to be visually pleasing and inspiring. I love to just come and be in this room- it's my escape from the world.
So this is the view of my new fitted unit on the left hand wall as you come in through the door. If you remember back to my old craft room, I had a really ugly old wardrobe here so I decided to update it. I need quite a lot of storage here but more for personal and business stuff rather than crafting. Having said that, the top drawer stores my planning supplies, the middle one stores my Xyron Sticker Maker and supplies for my Selphy and the bottom drawer stores all my art materials. The right hand lower cupboard stores some Project Life supplies and things in progress.
Some shiny pretties on my side unit! For more info on my craft room decor, see my Pinterest board.
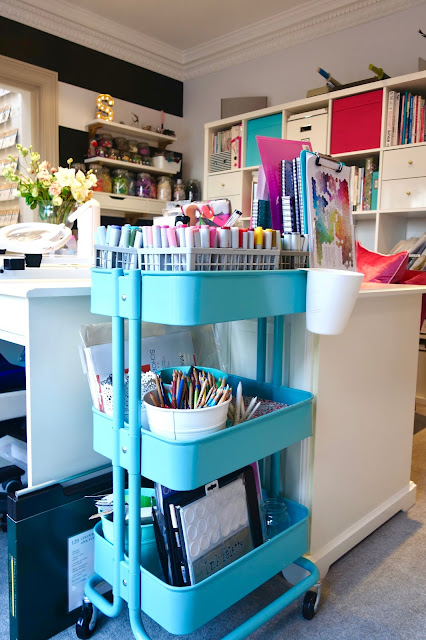
Next to my fitted unit is my Project Life Raskog trolley (and then in the corner I have the Ikea Galant Drawer Unit which I use for my cardstock storage (see How I Organise My Cardstock for more info).
On top of the cardstock unit I have an acrylic storage container with my PTI and SU ribbons in. On top of that is my cardstock and ink swatch book (for more information see How I Organise- Cardstock and How I Organise- Inks). On the right hand side is a large basket I store my brand new supplies in. At the back are some 12x12" papers/pads, on the left are stamps, middle are dies and right are 6x6" paper pads. There is usually a fair bit in there (*blush*) but I have a rule, if I haven't used it, it doesn't go onto my shelves or containers with the rest of my supplies- that way I know what I've used.
Above this unit is my display area using my acrylic shelving. This is where I display the cards I have made most recently before they get moved over into my Card Calendar or Spare Cards boxes. As I mentioned before, one of the most important requirements for me for my craft room was for it to be inspiring and be visually pleasing. I love that I can display my most recent cards- better than a picture on the wall, eh?!
Close up.
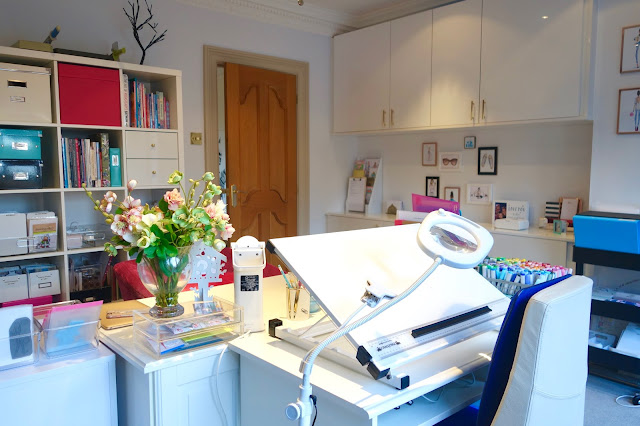
In front of my windows sits my colouring desk and the Raskog trolley which stores my colouring supplies. I use this brilliant easel and magnifying light when I'm colouring. Those of you with good memories, will remember that this desk used be where my cardstock filing unit now is and used to house my little photographic studio. I've actually changed how I take my photos and have moved the new little studio into our spare room.
To the left of my colouring desk is my feature wall. I love the stripes so much!!! I also had my Dad's old work desk refurbished from being a battered, brown 1960s office desk to this! Cool- no? This desk stores more personal/office type stuff. The large black and white storage box was from WHSmiths and stores my Scarlet Lime Planner kits. The gold letter tray was from Zara Home and I got two of these three-drawer tier sorters for my paperwork. You can also see the doorway into my little stamp room.
More pretties! I love the contrast of the pink and gold with black and white.
Here is the view across the room looking the other way towards my stamp room.
Here is the view across from my colouring desk showing my main Ikea unit. This unit used to be four by four but I updated this during this overhaul by adding an extra Kallax unit.
On the other side of the doorway into my stamp room is this little corner. The top shelves store my Bind It All, small Ikea jars filled with flowers and Doodlebug sequins. And can you see my Heidi Swap Marquee Love letter "S" I decorated?! Below that are my larger Ikea jars filled with ribbons. The drawers contain Bind It All supplies and miscellaneous stuff that I don't use very often like freebies from magazines (I never throw anything away!!)
Below the shelves are my card and paper storage units from Storage 4 Crafts. The unit on the left is for card and the one on the right is for 12 x 12" paper. I die-cut little circles of coloured card to denote the colour of each tray. On top of the paper unit I also store 12 x 12" paper pads in Cropper Hopper paper holders. (For more info, see my How I Organise- Papers and Cardstock sections.
Mmmm, lots of pretties!!
On top of my cardstock unit, I use this and this Muji acrylic container to store my small collection of Stickles, loose glitter, glitter sprays, micro beads, Liquid Pearls, Twinkling H2Os and alcohol inks.
So now we come to the big old Ikea Kallax unit! You'll see that I changed all the knobs on my Ikea furniture to be these brass ones as it suited my decor better. This sits directly behind my other desk. From top left to right I store- card making magazines and articles and my card sketches file; jewellery making supplies; material scraps; old stamps and supplies I don't use any more; craft & painting books; miscellaneous bits and bobs; spare card boxes; card calendar boxes; card making books and my sentiment folder and digital stamp folder; hot fix crystal applicator, Dymo Labeller and iTop Brad Maker; sentiment stamps; general acrylic stamps; Christmas stamps; Heidi Swapp Minc; my organisational supplies; 8 x 8" papers; 8 x 8 and 12 x 12" papers; Christmas 6 x 6"pads and embellies; Heidi Swapp Minc supplies, PTI spare cardstock and tissue paper; felt, resealable bags and Project Life album; four sections of 6 x 6" paper pads and finally altered art supplies. Phew!
Here is a close up of my spare cards and card calendar boxes. I use these boxes.
I have 2 Card Calendar boxes. These are simply for storing the cards I need per month for everyone's birthdays, anniversaries etc. I have one for the current year and one for the year ahead of that. I have a sheet where I've noted everyone's important dates and which card I'm giving them, then I simply drop them into the relevant month so they're ready to grab when I need them.
Obviously we all have spare cards so these go into my Spare Cards boxes. They are separated by theme as you can see. I have one separate box devoted entirely to female cards!
So now we've come full circle!
Here is my other desk. I use this for blogging, Project Life and work for my family business. I love to be able to look out onto the wonderful view I have. I have the Liatorp desk (changed the knobs!) and my chair is a Laura Ashley one. My desk light is a small Ott Light which I use in the evening which is when I do a lot of my work when lil one is in bed.
I have a few more acrylic containers on my desk. These are for Project Life and colouring storage.
This desk has two cupboards either side- the left one holds my card blanks and envelopes and the right one holds my punches and card for colouring.

To the right of my desk is another mini stacker from Storage 4 Crafts where I store my embellies. These are great as you can basically design your own storage unit. I chose to have 9 of the 1" trays and 5 of the 2" trays. In the 1" trays I have my embellies stored my colour. The 5 2" trays hold Sprinkles and pearls, sequins, sentiments, diets, 3D foam and sticky cork.
On top I store 2 containers which hold unused Stamping Bella and LOTV stamps that I'm going to use for my DT work.

Here is the view from my desk on a cold mid-December day!
So now we've come full circle in my main room, let's take a look in my little stamp room! Here is the view through the doorway at my acrylic shelves. For a more in depth look at all the stamp storage, take a look at my How I Organise- Stamps section.
My stamping desk is to the left as you enter the room. This is where I do my stamping and actually make my cards. My father in law made the desk out of a kitchen worktop. I don't have a chair in here as I like to make my cards standing up.
The 2 white storage containers are from GLTC and house all my tools. The small acrylic container against the back wall houses the stamps that I'm working on at the moment. The plastic box on the left hand side is where I store finished cards that need to be photographed before I put them on my card display shelves.
The gold clipboard on the wall has my Bellarific Friday schedule on. I made a little magnetic memo board using an old white picture frame and a magnetic die sheet. I have 2 acrylic wall storage containers on the left at the back and these house scraps of colouring cardstock that I use for stamping sentiments or smaller images. I also put a frame around my Stamping Bella decal when I repainted as I couldn't bear to be parted from it!!
You can also see my 2 die storage boards. For more info on these see my Organising- Die Cutting page.
Under the desk is my die-cutting area and my Alex Drawer Unit. I store my inks in the first 3 drawers. The bottom 2 drawers are for my wood mounted stamps and one I don't use very much (freebies from magazines etc).
The other drawer houses other supplies eg kitchen roll, baby wipes, large rolls of 3D foam tape, MISTI cleaner etc.
And that's it for my craft room tour!!
If you have any questions about how I store anything or about how to get hold of any of the items in my craft room, do let me know!
You can also view my My Favs Pinterest Boards and How I Organise pages to get more information.


17 comments:
wow steph i love it... i thought i had a fantastic space until i saw this now i am jealous.... i'm def going to steal your idea of coloured imaged with paper in little wallets... this would save me so much time (and stop my cats walking over just coloured images!!)... think i might just have to tweek my studio a little now...
jen xxxxx
your room is AWESOME!!! I love your little stamp studio! Great job making it what you wanted it to be.
OMG Steph, my jaw's on the floor, this is one amazing studio and I LOVE it!! It's so organised, spacious and pleasing to the eye, who wouldn't be inspired working in this gorgeous space. It certainly inspires me to alter a room in my house to accommodate my growing addiction to all things crafty!
Hugs Nicola xxx
Oh Wow!!!! Its amazing!!!!!!!!!!!!!!!!!
Although I'm still getting over the fact that this is the smallest room in the house (its bigger than our biggest bedrrom lol....)
WOOOOOW, I am well Jell lol. What a fantastic place to create, awesome, I hope to have something like this one day, just gorgeous, Gaynor xx
This is a really fabulous space. It is so organized and so inspiring. Makes me long for my old craftroom. I am back to the kitchen table. You have given me great ideas for my future creative space. Thanks so much for sharing!!
Oohhhh I want one, I need one......when I win the lottery of course!!!
Ooh! Steph, what a wonderful craft room. You must have the best time in there. Everything is so organised. Like Jen, I LOVE the idea of the image and papers stored together for when you need them. Thank You hun, for the tour, I really enjoyed it. :o)
Donna x
Wow! What an amazing room! I thought I was lucky having a small bedroom for my play area but yours is just awesome! Its so organised and tidy and I am lost for words! You have done a fantastic job with it! xxx
Hi Steph, I thought I had already left a comment here but I must not have. I LOVE your craft room, it is amazing! I love the stamp storage idea and the shelves. Love it all, when can I come and play?! xx
wow Steph...just having a nosey at your craft room...I am so jealous...mine is like a cupboard compared to yours...it's just to die for!!
Fi
x
Oh My Goodness.....I NEEEEED your studio!! Amazing Steph, I don't think I'd ever leave the room if I had one! Brilliant ideas and a beautiful space, thanks for the tour :o)
Hugs,
Cazza
x
Oh, this is so amazing!
You've got your studio so well organised!
Thanks for sharing and inspiring others!
Bye,
Marjolein
Steph your stamp room is AMAZING!! I LOVE the Stamping Bell decal on your wall!!!
Wow, what a fantastic place to create . great job . keep it upppppppppp a long time . all d bestworktop
Great job, I like it, we make all kinds of Acrylic Display Stands
Your craft room is such an inspiring space! I love how the organization and cozy decor bring out creative energy—it’s giving major Living room vibes! Thanks for sharing your setup—it’s motivation to spruce up my own workspace!
Post a Comment