Showing posts with label Gifts. Show all posts

Friday, 5 June 2015

Bellarific Friday- Big Words!

Hey Bella lovers! 
It's Bellarific Friday, it's ANYTHING GOES and it's STAMP OF THE MONTH!


So I decided to make a gift voucher holder using Samantha And Sierra Take A Selfie and our STAMP OF THE MONTH which was to use any of the BIG WORDS- I used Ridiculously Brilliant. Samantha and Sierra are coloured using copics and then fussy cut. To the sentiment I stamped some contrasting stripe patterns in alternating inks. The holder was constructed using Mama Elephant dies. Hearts are by Paper Smooches.


Your close up of Uptownies


Close up of BIG WORDS sentiment.
These sentiments are so cool as they are designed for outside and inside the card. Fab, no?

Once again, I'm giving a shout out to Pamela Ho for using her holder design

Next week's challenge is ANYTHING BUT A CARD! Entry deets are here.

Crafty stash used: Stamps (Stamping Bella, MFT); Copics; Dies (Mama Elephant, Paper Smooches); Assorted cardstock; Stickles; Baker's Twine; Inks (PTI, SU)

Tuesday, 21 February 2012

Anything Goes Challenge- Box it, bag it, tag it!

Hello all! Hope you had a lovely weekend. We had some gorgeous sunshine so it made a change from all the snow we've been having!! It's Tuesday so it's Anything Goes Challenge time. This week's theme is Box it, Bag it, Tag it! You can make a new or altered project- no cards this week!

Now I have to admit, I'm not really into creating boxes n stuff but it wouldn't be a challenge otherwise, right?! And I actually really enjoyed it, sometimes it's good to try something different!

I decided to make this cute little bird box for my Mum as a cute little gift. We've both recently purchased bird feeders for our gardens so I thought this was quite appropriate!

This bird box was created using this template on Nichole Heady's blog. It couldn't be simpler- really!! I used My Mind's Eye papers Urban Prairie- you need a 12" x 12" sheet for the main box. I used a round and a scalloped nestie to make the entrance. Can you see the bird seed inside?

The left hand side of the birdbox I decorated with the butterfly Die-namic die from MFT. The pretty gems are from The Craft Den.

The right hand side I decorated with a Magnolia tag die (available from The Craft Den), cute sentiment from the PTI Love Lives Here Holiday stamp set and a bird cut out from the papers I used.

I hope you have fun with this challenge, do check out the rest of the DT as their work is amazing this week!!

Crafty stash used: Stamps (PTI); Papers (MME); Assorted cardstock; Template (PTI); Nesties; Tag die (Magnolia); Butterfly die (MFT); Gems (The Craft Den); Ribbon (Recycled); Flower (Ebay); Pearl

Tuesday, 20 September 2011

Anything Goes Challenge- Anything Goes!

Hi crafty folks! Sorry I haven't been around much but I've not been too well. Luckily I had this challenge covered a little early!

So it's Tuesday which means it's time for another challenge over at Anything Goes Challenge! And well, it's a nice and easy one for you, it's.....Anything Goes!! :0)

So I made these little post-it note holders for stocking fillers for Christmas presents. When I got my Bind-It-All last Christmas, I was determined to make some little gifts with it so here they are! Post It Notes are so useful but pretty boring looking so I thought this would jazz them up a bit. They can always be easily refilled so become a nice long-lasting gift recipients can use time and time again.

I got some inspiration by looking a videos on You Tube and then kinda did my own thing.

So I made these using chipboard which I covered with MME and Echo Park papers. I kinda had a little production line going as I thought it would be easier to create them all with the same design. Firstly I came up with a little "sketch" I was going to use for the cover, this made planning alot easier! The stamps I used were from the Papertrey Ink Take Note set which I hope to use for many more gifts like decorated notebooks etc.

I'd like to enter these into:
Stamp With Fun- anything goes
Allsorts- alter/recycle- I altered chipboard

Here is a closer look at one of them. You can see how I added a paperclip. I thought this added texture and was quite visually pleasing. There is a little paperclip stamp in the Take Note set but I thought a real one would work better. I also added a bit more tactile-ness (!) but adding buttons and twine and tied ribbon around the binding.

Another look at all 3. I rounded the corners of my chipboard using a Zutter corner rounder which is meant to cut all sorts of materials, it easily cut through this chipboard.

Another close up! These are great for using up scraps of papers.

And a quick look inside!

Thanks for looking today, hope you liked this project, if you have any questions about how I made them don't hesitate to ask!

Do take a look at the rest of DT's samples as they're gorgeous as always! Don't forget Lynne atThe Craft Den has all sorts of chipboard for altering like I've done here and lots and lots of other altering goodies so do check them out! x

Crafty stash used: Stamps (Papertrey Ink); Chipboard; Papers (MME, Echo Park); Bind It All; Corner rounder punch (Zutter); Post It Note pads; Ribbons; Paperclips; Buttons & twine

Tuesday, 8 March 2011

Cupcake anyone...?

Hi folks! How's it going? We're having glorious sunshine here in Essex at the moment! Things are going well here. My Mum's procedure went well. She's come home with another stent in (boo) but they removed the drain! Yay! She is even thinking of going home in the next week or so which will be a bit wierd as she's been living here for 4 months now!!!!!

So I've got a bit of a long post today. I've made 3 cards and a bookmark for you to view. I'm also doing alot of work on my next Bind-It-All project which is a craft organiser. I can't wait to share it with you as I think it'll be super useful and I haven't seen that anyone has done anything similar.

Onto my first card.....

First up today is an old fav Stamping Bella stamp- Cupcakeabella. My Mum has asked me to make a card for one of her friend's birthdays who is a bit partial to cakes so I thought this would be perfect! I coloured her with a mixture of watercolour pencils and lyra pencils and paper pieced her dress. The gorgeous papers are by Heidi Grace Designs. The sentiment stamp is Hero Arts from their cupcake set. Do please click on the image to see it in more detail, for some reason it looks a bit dark in this photo.

I'd like to enter this into:
Simon Says Stamp- 1 image, 2 papers, 3 types of embellies
Alphabet Challenge- use ribbon
Cupcake Challenge- pink polka dots (they're pink & lilac, hope ok!)


Here is a close up of her! Doesn't that cupcake look yummy?!!

Crafty stash used: Stamps (Stamping Bella, Hero Arts); Copics; Watercolour pencils; Lyra pencils; Papers (Heidi Grace); Assorted cardstock; Nesties; Ribbon (Stampin Up); Pearls (Wild Orchid Crafts?); Buttons (Walmart); Flowers (Prima); Gem (Prima)


Next up is a card for my friend's little girl using this cutie Penny Black teddy. I coloured her with watercolour pencils and lyra pencils. The papers are by My Mind's Eye. The decorative strip is by K&Co. The sentiment is Papertrey Ink.

I'd like to enter this into:
Cute Card Thursday- signs of Spring
Dutch Dare- who's who in the zoo
Charisma Cardz- four legged friends
Diecut Dreams- Spring garden

Crafty stash used: Image (Penny Black); Stamp (Papertrey Ink); Copics; Lyra pencils; Watercolour pencils; Papers (MME); Assorted cardstock; Nesties; Decorative strip (K&Co); Buttons; Brads (Woodware); Gem (freebie)


Next up is a card for our friend's 40th birthday using this fab Riley stamp. Riley is coloured with copics and his t-shirt is paper pieced. The sentiment is a Pink Petticoat one punched out with my Stampin Up window punch. The beer glass is a diecut I bought off Ebay ages ago. The little stars are a Die-namic strip which I cut into individual stars to decorate.

I'd like to enter this into:
Create4fun-sketch
Crafty Catz- special birthdays
Stamp Something- use something digi - my sentiment

Crafty stash used: Stamp (Riley); Sentiment (Pink Petticoat); Copics; Papers (Basic Grey); Stars (Die-namics die); Punch (Stampin Up); Beer die-cut (Ebay)

Lastly up is a non-card item!!! I'm doing really well this year for sticking to my crafting aims- one of which is to make some non-card gifts. I made this magnetic bookmark using the iTop Brad Maker I got in the US last year on hols. I was really chuffed with myself as I made the whole thing from scratch and had to figure out how the whole magnet thing was going to work.
I used scraps of papers which is great for using up your scrappy stash and used my sewing machine to add some texture. So I initially made the brad using the brad maker. Here you see my bookmark "at rest" lol....
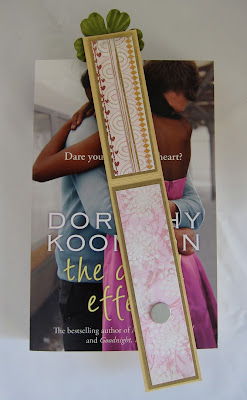
Here you can now see it open and see the magnet which grips onto the back of the brad. I used one half of a magnet-daddy to do this.

Here you see the bookmark "at work"!! It grips really well to the page and the brad doesn't make the book bulge too much when the book is shut. I like how the flower looks onto the book page.

I'd like to enter this into:
Cutie Sunday- bookmark

I'm going to make more of these for friend's during the year so I will do a tutorial if anyone's interested to show how easy the iTop is to use.

Crafty stash used: iTop brad maker; brad daddies; magnet daddies; flower; paper scraps; assorted cardstock; sewing machine

And lastly some naughty new crafty stash. Really, all this stress is no good for my purse!!!!! Another one of my new crafty "resolutions" was to try some different things/styles so I decided I wanted to do some vintage cards, especially for Christmas. I looked around for some stamps that were really versatile and coordinated with each other and came up with this lot from Waltzing Mouse Stamps. I'm a bit reticent about using them now as it's so out of my comfort zone!!! Doh!!! Does anyone else have that problem? Watch this space!

Thanks so much for taking the time to drop by today- I know it's been a bit of a loooong post! Hope you have a fun week and get to enjoy some of this lovely sunshine we're having at the moment. xxx


Monday, 30 November 2009

Is this getting boring???! More Christmas cards... and a gift!

Hi. I hope everyone had a good weekend. Did you see the X Factor? Thank goodness Lloyd has gone. Cute kid but way out of his depth. I think this week will be the really interesting week as all 4 of them are good singers. I think the finalists will be Olly, Stacey and Joe. What do you all think?

I'm feeling a bit better but not great. I've got to ring the GP for my test results today so I'm hoping it'll be a case of just getting some more antibiotics. Anyway, feeling grotty gave me the chance to do alot of crafting so here are my makes for last week.

This first card I'm really pleased with. I wanted to go for a more elegant style. Using my nesties I cut a circle out of a post-it note and then stuck it down on white card to act as a mask. I stippled a variety of blue and silver inks around the edge of it. I then took off the post-it to reveal a white circle. I then stamped the Papermania deer over the top of the circle. I then used this gorgeous Inkadinkado beaded swirl set to create a frame by stamping off the page. I then double mounted it and tied a bit of recycled ribbon around it. The sentiment is from the Papermania set too. I'm not sure where the paper is from, I bought it as a single sheet.

Crafty stash used: Stamps (Papermania & Inkadinkado); Assorted cardstock; Ribbon (recycled); Buttons (Recycled); Nesties; Inks & stipple brush; Post-it note

I liked this style so much I decided to do the same thing for this gorgeous Inkadinkado lamp stamp. This time I used an oval nestie and I did the edging on the main background of the card instead of the image. Finally I added a Christmas ribbon and some hot fix crystals.

Crafty stash used: Stamps (Inkadinkado); Assorted cardstock; Ribbon (?); Hot fix crystals (London Bead Co.); Inks & stipple brush; Post-it note; Nesties

I've had a couple of orders for my handbag charms for Christmas presents so this is the first one I made this week. The photo doesn't really do it justice as the light is reflecting on the colours too much but you get the general idea! This one is called Red Scarlet.

So now on to some challenges! This card is for the Our Creative Corner Challenge who have a sketch with baubles to follow. It came along at just the right time as my friend, Fi, bought me these fab little bauble embellies and I was wanting to use them! The paper is Papermania. I pulled the hanging thread out the back of the embellies to make one long thread rather than a loop. I added some lovely wide silver ribbon with a strip of silver on top and then added a silver Sizzix swirl which I thought would look great as a sort of silvery branch. I then added a sentiment and silver sequins (also from the set Fi gave me).

Crafty stash used: Paper (Papermania); Assorted cardstock; Embellies (The Works); Stamp (Papermania); Swirl (Sizzix); Ribbon (recycled)

And on to my final make. This is for the ABC Challenge and Card Patterns and Our Secret Crafter. The ABC Challenge is I for Indigo Blue. I'm not sure if this looks indigo blue in the photo as the flash had to be on but it is! Card Patterns obviously have a sketch to follow and Our Secret Crafters' Challenge is Christmas trees.

The paper is by Doodlebug, the trees are little embellies given to me by the lovely Fi as well! The gems are by Lakeland. I loved this sketch, think I will use it again!

Crafty stash used: Papers (Doodlebug); Assorted cardstock; Embellies (The Works); Gems (Lakeland)

Hope you enjoyed your visit today. Look forward to seeing you all soon! x

Saturday, 3 January 2009

More Christmas gifts

Hi everyone! Happy New Year to you all and thanks for all your support since my blog has been up and running! 

Just one last post showing a couple of other gifts I made as part of Christmas presents for family. The top one is a watercolour painting I did for my Dad. I'm just at the end of a watercolour painting class called "Houses and gardens" and this is the last painting I did. I'm quite pleased with it as I think the perspective came out quite well. If you're interested in seeing any of my other watercolours, you can check them out on my gallery on the side bar.
This was a little stocking filler for my Aunt. I made a little felt wallet and filled it with notelets. I can't sew to save my life- I had trouble sewing on the buttons!!- so I mainly used Bondaweb to seal the whole thing together which is a life saver for someone like me!
So here is one of the notelets. The image on the notelet is actually a watercolour painting I did of a Hibiscus which I gave to my Aunt last Christmas! (see my Painting gallery). I simply resized it and printed it out on little notelets. I think it makes quite a sweet little gift.
Finally I must just say thanks to Maddie as I won her fab blog candy earrings and she also sent me a little Calvin! How cute is that?

PS My next post will be lots of photos of all the lovely bits I got for Christmas!! Believe me, it was ALOT! I was very spoilt and I can't wait to show you all! x

Saturday, 27 December 2008

Christmas gifts

Hi! Hope you all had a lovely Christmas. Just thought I'd do a post of a present I made for my sis for Christmas- a planner. She's always making lists of things to do so I thought this would be a good present to make. The base is a Maya Road chipboard 5 ring binder from Graphicus. The front cover is covered with paper from American Crafts from Sarah's Cards. The writing is printed out from my PC using Tall Paul font. The heart is from a Making Memories tag maker set which I filled with pink card and added a flower, button and ribbon. The tied ribbons are from Poppicrafts. 
The first page inside is for exercise plans (my sis likes her exercise!) and is a Stamping Bella image. The paper is from the Pastel Papermania set, as is the embellishment. Image is coloured with watercolour pencils. 
The second page is for work planning. The image is Pink Petticoat coloured in with watercolour pencils and highlighted with Crystal Stickles. Paper is from Retro Papermania kit, as is sticky ribbon. Flower from Poppicrafts, brad from Woodware.
The next page is for shopping lists. Image from Pink Petticoat coloured in with watercolour pencils and highlighted with Crystal Stickles and a gel pen. Paper and card is from American Crafts and I added some hot fix crystals.
Next image is holiday planning. Image from Pink Petticoat coloured in with watercolour pencils, highlighted with Crystal Stickles, gel pens and pink Liquid Pearls. Paper and card is from American Crafts and I added a flower gem from Joanna Sheen.
The next page is for birthday planning. Image from Pink Petticoat, coloured in with watercolour pencils and highlighted with Crystal Stickles and Liquid Pearls. Flowers, ribbon and brad from Poppicrafts, little gem was recycled. Paper and card from American Crafts.
The last page is for Christmas lists. Image from Pink Petticoat coloured with watercolour pencils and highlighted with Gold Stickles. Paper from Artic Frog. Stars were recycled.

Crafty stash used: Chipboard album (Maya Road); Paper (American Crafts, Artic Frog, Papermania); Card (American Crafts); Stamps (Stamping Bella, Pink Petticoat); Watercolour pencils; Crystal & Gold Stickles; Gel pens (Sakura); Liquid Pearls; Flowers (Poppicrafts); Ribbon (Poppicrafts); Heart frame (Making Memories); Brads (Poppicrafts & Woodware); Stars (recycled); Flower gem (Joanna Sheen); Silver flower gem (recycled); Hot fix crystals; A4 paper; hole punch

So I hope you like it. It took me absolutely ages to make- the covering of the pages wasn't as easy as it looked and because of all the rings, I had to punch individual holes for all the paper! Anyway, I think it came out well and my sis liked it! x