Showing posts with label Kid's birthday. Show all posts

Tuesday, 28 November 2023

Lili Of The Valley- Bonfire Night!

Hello!

Today I'm sharing a card I made for my son's 10th birthday which is on Nov 5th! I've had this LOTV stamp for so long waiting to use it and I decided this year was the year!!


 I coloured the image with copics and fussy cut around. I then created a Distress Oxide background, splashed with water and heat embossed some firework stamps and also used them to create the glow around the sparkler. I heat embossed a sentiment and die cut in mirror card the number 10- it looks better in real life, I've discovered mirror card is super hard to photograph well! 

Craft supplies: Stamps (LOTV, MFT); Copics; White gel pen; Distress Oxides; White embossing powder (Wow); Mirror card (Altenew); Glitter card (Altenew?); Cardstock (PTI)

Monday, 24 May 2021

Stamping Bella- Tiny Townie With An Elephant!

Hello!!

Hope you're all well. Today I'm showcasing the adorable Stamping Bella Tiny Townie With An Elephant... 


I coloured the image with copics and added some sparkle with Stickles and stamped the accompanying sentiment. I added a strip of spotty DP at the base of the card, some die cut banners and enamel dots.

Supplies: Stamps (Stamping Bella); Copics; Paper (Echo Park?); Enamel dots (Doodlebug); Dies (MFT); Stickles

Tuesday, 16 February 2021

MFT- Magical Day!

 Hello!

Today I'm sharing this cute bear stamp set from MFT called Magical Day...


I'm not sure why they discontinued these as I thought they were super cute! I coloured with copics and added white gel pen highlights and then fussy cut. I blended a Distress Oxide background and then stamped and embossed (with silver embossing powder) some sparkly bits from the MFT Fireworks stamp set. Finally I embossed a sentiment that came with the Magical Day set and added a black Large Shaker Window Frame Die.

Supplies: Stamps (MFT); Dies (MFT); Distress Oxides; Copics; Silver embossing powder 

Thursday, 19 November 2020

Magnolia- Edwin Tennis!

I recently made this card for my little boy as he is mad about tennis. Nadal is one of his favourites so I personalised the card to have a Nadal t shirt and then gave him a racket, shorts, sweatband and trainers like my little boy.... 


Don't you just love the beauty of being able to personalise a card, so cool right?!!!

Thanks for stopping by x

Supplies: Stamps (Magnolia, Honey Bee, Mama Elephant); Distress Oxides; Copics; White gel pen; Paper (MFT)

Wednesday, 1 July 2020

Paper Nest Dolls- Mermaid set!

Hello, today I'm featured on the Paper Nest Dolls blog. I've got a couple of cards to show you from the latest Paper Nest Dolls release...

Both of these are from the Mermaid set. You can buy the digital version or in rubber! 


I coloured up the mermaid, seaweed, fish and puffer fish with copics and fussy cut. I then created a background using the Taylored Expressions Go With The Flow stencil; Distress Oxides and Nuvo Glimmer Paste. I then used an MFT die to cut to the rounded tag shape. I then layered some aqua cardstock and added the tag on top. Finally I assembled all the pieces including a heat embossed sentiment. 


I coloured the mermaid and seaweed up with copics and fussy cut along with some seaweed. I created a background using a Taylored Expressions stencil and circle masking stencil and Distress Oxides. I then added a strip of cardstock I'd alcohol ink'd. I assembled all the pieces, added a sentiment and some Raindrops.


Aren't these just the cutest?!! Such a cool variety of mermaid and all the accessories you could ever want for a sea scene! There are 12 images in total in this set!!! 4 mermaids and assorted sea creatures, bubbles, seaweed etc!

Supplies:
Card 1: Stamps (Paper Nest Dolls, Stamping Bella); Copics; White gel pen; Distress Oxides; Stencil (Taylored Expressions); Nuvo Glimmer Paste; Dies (MFT); Twine (Doodlebug); Cardstock (PTI); White embossing powder (WOW); Stickles 
Card 2: Stamps (Paper Nest Dolls, Stamping Bella); Copics; Distress Oxides; Stencil (Taylored Expressions); Alcohol inks; Raindrops (PTI); Stickles

Monday, 1 June 2020

Stamping Bella- Tiny Townie Garden Girl Violet!

Hellooooo!

Today I am sharing Stamping Bella's Tiny Townie Garden Girl Violet coloured using the no lines colouring technique...


I coloured her with copics and cut out using an oval die. I used a DP background and created a shaker card. I used the large Stamping Bella "happy" die  and then assembled all the pieces. The sentiment is part of the Stamping Bella Tiny Townie Blossom Loves Balloons sentiment.


Here is your close up!

Supplies: Stamps (Stamping Bella); Copics; Paper (Colorbox); Dies (Stamping Bella, PTI, Nesties); Cardstock (PTI); Ink (PTI); Sequins

Saturday, 8 February 2020

Stamping Bella: Under The Sea Creatures!

Hey! Today I'm sharing a CAS Stamping Bella card featuring the very cute whale from Under The Sea Creatures...


I coloured the whale with copics and fussy cut. I then used the Taylored Expressions Splash stencil and Distress Inks through the Taylored Expressions Masking Circle stencil. I then stamped the sentiment from the Stamping Bella Under The Sea Sentiment Set and added some raindrops. Finished with a strip of DP.

Supplies: Stamps (Stamping Bella); Stencils (Taylored Expressions); Raindrops (PTI); Paper (Carta Bella); Distress Inks

Saturday, 14 December 2019

MFT December Release- Magical Friends!

Hey! I just can't get enough of this stamp set!! Here's another card I made for the December MFT Release using BB's Magical Friends...


I coloured with copics using the no-lines technique and then cut out using the matching dies. I made a watercolour background which I mounted onto Over The Rainbow Paper Pad. I then heated embossed a matching sentiment and die cut using a fishtail banner. Finally I added some sequins.

Thanks for stopping by today. Don't forget the December release is now available to purchase!! x

Wednesday, 11 December 2019

MFT December Release- Magical Friends!

Here's another card I made for the amazing MFT December Release. 

This is from the new Birdie Brown Magical Friends set...


All the different elements in this set are just so cute and go to make up a really versatile set of stamps you can used for lots of different occasions. I coloured up with copics and added some white gel pen. Then I cut with the matching dies. 

I made an aperture using the Stitched Arch Stax Dienamics and layered some watercolour wash paper behind. I stamped the matching sentiment and added a sweet crown. I finished with some teeny star sequins.

Supplies: Stamps (MFT); copics; Dies (MFT); White gel pen; Papers (MFT); Sequins


Friday, 15 November 2019

LOTV- Celebrate footballer!

Hey hey hey!!

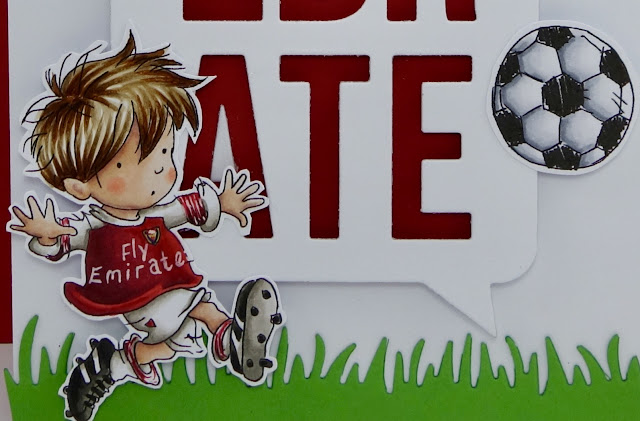
Today I'm sharing my little boy's 6th birthday card featuring this cute footballer from LOTV...


I coloured the image with copics and added some details to make it look like an Arsenal kit and then fussy cut. I used MFT dies to cut the grass and the celebrate sentiment. I then assembled the card, raising some elements up on 3d foam pads. It's a simple card but I love how it turned out. 


Here's your close up! x

Supplies: Stamps (LOTV); Copics; White gel pen; Dies (MFT); Cardstock (PTI); Copic fine multiliners

Tuesday, 2 July 2019

Stamping Bella New Release Sneaky Peeks Day 2- Tiny Townies!!!!

Yay yay yay!! I can't wait to show you today's Tiny Townies, you are going to love them!!!!

So first up is Tiny Townie Hair Play....


I coloured the girls with copics and added some white gel pen highlights. I then fussy cut. I created a panel by masking off a strip and using a stencil and Distress Oxides and then placing some thin strips of DP either side. I raised the Townies onto 3d foam pads as well as the sentiment. Finally I finished off with the Bestie die. So sweet to send to your best friend!

Next up is Tiny Townie Tire Swing...


OMG, how adorable is she??!!! I coloured her with copics and added white gel pen highlights and then fussy cut. I then stamped and coloured the Garden Backdrop. I then created an aperture in a panel to sit on 3d foam pads above the Garden Backdrop and then I adhered Tiny Townie over the backdrop using a mixture of 3d foam pads and double sided tape. Finally I stamped the sentiment in the corner.

Wheeee! Now we have Tiny Townie Hula Hoopers....


Seriously cute, right?! I coloured with copics and added my usual highlights and then fussy cut. I created a Distress Oxide panel, splashed some water on and then stencilled some little light sparks using white ink. I adhered the Townies using 3d foam pads and added a die-cut Celebrate sentiment covered in Stickles for that glitter factor.

Got to say here that I give kudos to Francine Vuilleme for inspiration for the background strip.

Last up for the Townies is Tiny Townie Pirate.....


Again, this has just got to be a must-have in your basket, right?! I coloured with copics and paper pieced her pirate hat and stamped the sentiment above leaving enough space for my die-cut banners. Finally added some DP as a strip along the bottom.

Hasn't this been an amazing release so far? Don't forget to get on over to see the rest of the DT samples over on Blogabella.  I'll see you on Thursday for some Curvy Girls!!! x

Supplies: Stamps (Stamping Bella); Copics; White gel pen; DP (Carta Bella, Echo Park); Dies (Stamping Bella, MFT); Stickles; Stapler (Tim Holtz); Stencils (MFT, Tim Holtz); Distress Oxides

Monday, 1 July 2019

Stamping Bella New Release Sneaky Peeks Day 1: Girl Scout and Boy Scout!

Woooooo hoooooooo! It's that time again- it's time for sneaky peeks of the new Stamping Bella release ready in time for release day which is Monday July 8th!

Are you ready cos this release is crazy amazing?!

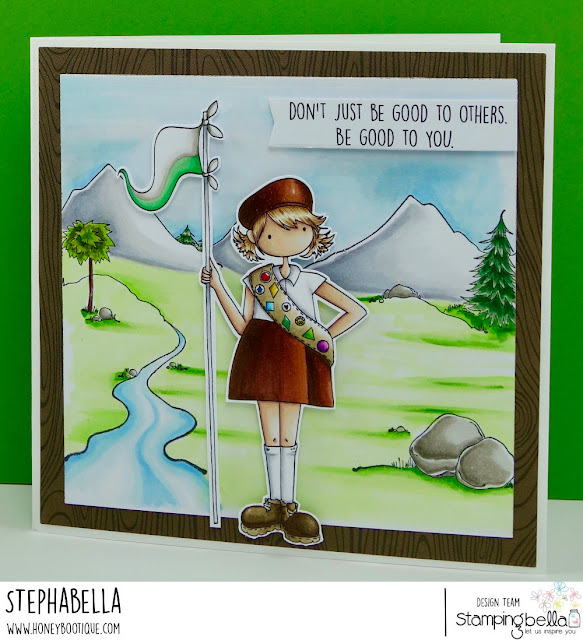
So I'm kicking off today's release with Girl Scout.....


Isn't she awesome?! I coloured her with copics and then fussy cut. I then also coloured the Cave Kids Backdrop and mounted her with 3d foam pads. Isn't the sentiment just adorable? Finished with some layering onto some wood patterned paper.

Next up is Boy Scout....


LOVE his uniform, no? Again I coloured with copics and fussy cut. I then created a simple background using a cloud stencil and a die-cut strip of grass.

Get yourself on over to Blogabella to check out all the other samples and, of course, the rest of the DT!

I'm gonna be back with four samples to show you- you are gonna be rushing out to buy these stamps, I promise you!!

Supplies: Stamps (Stamping Bella); Copics; White gel pen; Dies (MFT); Stencil (MFT); Distress Oxide Ink; Papers (MFT)


Monday, 20 May 2019

Reverse Confetti- Unicorn Wishes!

Helloooooo!

An ultra simple card today using no-lines colouring and Reverse Confetti's Unicorn Wishes....


I love how the no-lines colouring can create such a dreamy effect, perfect for a little unicorn and rainbow scene.


Supplies: Stamps (Reverse Confetti); Paper (MFT); Sequins; Cardstock (PTI); Stickles

Saturday, 27 April 2019

MFT- Ninja-mazing!

Hallo. Today I'm sharing MFT's Ninja-mazing set....


Close up!

Supplies: Stamps (MFT); Copics; Distress Oxides; White embossing powder (SSS); Cardstock (PTI); Paper (MFT)

Wednesday, 20 February 2019

MFT- Pure Innocence Cupcake Day!

Hi ya!
Hope you're all doing well. Here's a card I made using an MFT image I coloured up for the 30 Day Colouring Challenge last June!!!! Seeing the new colouring challenge on Instagram has shamed me into making cards with all the images I coloured last year!! I can't start another June Challenge not having made cards with all last year's images!! How quickly time flies!!

Anyway this is MFT Pure Innocence Cupcake Day...


I coloured with copics and added some white gel pen. I then fussy cut and put some Stickles on her cupcake. Following the latest MFT Sketch Challenge, I then laid out some MFT papers, MFT "wish" die and PI in the layout of the sketch. I added a sentiment from the Mama Elephant Label set but shortened it so that it accompanied the wish sentiment. I then added some die cut teeny starts and some glitter to the "i".


Here's your close up! She's so party ready!!

Thanks for stopping by X

Supplies: Stamps (MFT, Mama Elephant); Copics; White gel pen; Paper (MFT); Dies (MFT); Stickles; Glitter (Lakeland)

Saturday, 16 February 2019

Stamping Bella- Tiny Townie Fairy Garden Fairy!

Hellooooooo!

How are you all today? Well the snowdrops are up and we have our first daffodil so Spring is officially here!!!!! Yay!!! I've got a cute Spring card to share with you in the next week or so.

Today I've got a Stamping Bella image to share that I shamefully coloured up last June for the 30 day colouring challenge but hadn't made a card with. I had a stack of images from the challenge that I've been working through, I've now got a handful left but I want to get these on a card before the next challenge!!


I coloured with copics using the no lines technique and obviously did some masking on the her legs in order to place her on the toadstool. A fairly simple card as I wanted the image to do the talking. Just added a touch of glitter, stamped the sentiment (always scary to stamp over the image you've spent hours colouring!!), added some sequins and some background paper. Job done!


Your close up! Isn't she adorable?! 
See you next week, thanks for stopping by x

Supplies: Stamps (Stamping Bella); Copics; Stickles; Paper (LOTV- now retired); Sequins (Doodlebug); White gel pen

Thursday, 25 October 2018

Lili Of The Valley- Back To School Boy!

Hi everyone!

Today I'm sharing another non-Christmas card and it's a very special one! My amazing little boy is actually going to be 5 very soon! I can't believe it!! 

I decided to use LOTV's Back To School Boy as he's started school this year ...


I coloured the image with copics and added some white gel pen. I coloured in his school uniform colours which I think he's going to love. He's even got a book bag like that!! I then fussy cut out. I created an aperture in a panel and laid PTI gridded paper behind. I then raised up the panel and boy on 3d foam pads. I then die cut "zach" and "5th" using PTI dies and adhered them with glue. Finally I stamped the sentiment and raised up on 3d foam pads.


Here's your close up! See how I wrote Zach's name on his PE bag?!! It's the little things, peeps!!! x

Supplies: Stamps (LOTV, Altenew?); Copics; Lyra pencil; White gel pen; Dies (PTI, Lil Inkers); Papers (PTI); Cardstock (SU)

Sunday, 2 September 2018

Stamping Bella New Release Sneaky Peeks Day 5!

Well it's Day 5 of the new release from Stamping Bella- is your shopping basket gonna be overflowing with Bella goodness?!! I can't believe how Em produces so many amazing images every release!!

Today I am showcasing ODDBALL WIZARD...


Such a fun image to colour! And so versatile too- Halloween, kid's birthdays, male birthdays... I coloured with copics and added some highlights with white pencil. I then fussy cut leaving no white space which was a bit of a job considering how thin that staff is!!

I wanted to make a galaxy background so I blended together some Distress Oxides, splattered with water and then I splattered with Dylusions white paint. I then stuck down the image and some teeny silver stars along with the very sweet sentiment. I then die-cut a large stitched frame and made the panel into a shaker card. 


Here's your close up!


The sparkle is wonderful in real life and the galaxy background is really eye-catching.

So that's all of the release from me. There are two more days of the release left so don't forget to keep checking the blog for the full range and, of course, the other DT samples! Also, remember Em always offers the chance to win some of the release if you comment on the blog!

RELEASE DAY IS SEPTEMBER 5TH!!!!!!!!!!

Supplies: Stamps (Stamping Bella); Copics; White pencil; Distress Oxides; Dylusions Acrylic Paint; Shaker stars (Lucy's Cards); Black cardstock (PTI); Acetate; Dies (MFT)


Friday, 6 July 2018

LOTV- Oliver Game Boy

Hi ya. How are you my lovely crafting friends!

Today I have a LOTV card featuring Oliver Game Boy...


I coloured Oliver with copics and then cut a panel around him which I stuck to the card blank. I then cut a strip of patterned paper for the bottom of the card blank. I added a Mama Elephant sentiment and finally simply added some sprinkles.


Your close up.

Thanks for stopping by today. Hope to see you again soon x

Supplies: Stamps (LOTV, Mama Elephant); Copics; Papers (MME); Sprinkles (Doodlebug)

Tuesday, 29 May 2018

Lili Of The Valley- Big Present!

Hi ya my crafty friends!

I'm really excited to be joining in with the 30 Day Colouring Challenge this time around which begins on 1st June- are any of you doing it? If you want to catch up with my daily colouring, don't forget to check out my Instagram account and, of course, don't forget to follow me there if you aren't already!! 

Hope you're all well. Here's another card I made yonks ago but haven't had a chance to post featuring LOTV's Big Present...


I coloured him with copics and fussy cut. I then made a clean and simple card by cutting a panel to fit the front side of the card blank. I then die cut some stars using MFT dies and adhered some patterned paper to the front of the card blank so that it appeared behind the die-cut stars in the panel. I added a strip of paper to the front of the panel and then stuck the panel down to the card blank. I then raised the image up on 3d pads and adhered to the middle of the panel and then stamped the PTI sentiment onto a die-cut stitched banner. I then raised the banner up on 3d foam pads as well. 


Such a cute image!!

Supplies: Stamps (LOTV, PTI); Copics; Papers (Echo Park); Dies (MFT)